Friday, November 28, 2014

How To Clean and Maintain Mosaic Tiles

Our friend +Pheeby Snow  is back with us today. She is offering her advice on how to take special care of your mosaic tiles.

Mosaic Cleaning and Maintenance


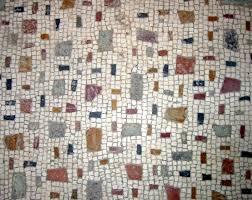
Mosaic has always been a stylish option for the floor or wall decoration as it is suitable addition to both contemporary and more classic designs. Mosaics are always a fantastic choice for creating a beautiful atmosphere in the premises of your home. 

Whether in your kitchen, bathroom, or other facility, you can choose among a wide range of options if you want to have mosaic tiles in your home. They look just ideal as long as you maintain them appropriately.

Because of their smaller size, the mosaic tiles need special care and maintenance on a regular basis. If you want to preserve their good appearance for a longer time,  you need to make sure that you clean them in the right way and with the most suitable products. Unless you pay attention to the condition of your mosaic tiles, you risk serious damage and after that you will need to buy new mosaic tiles for your walls and floor. 

In order to avoid this unpleasant situation, we will offer you some ways in which you can clean your mosaic and maintain it in an excellent condition.


The efficiency of the sealant


A sealant that is waterproof plays great role for the maintenance of the mosaic tiles. Once you have put the tiles and you have filled the joints with suitable grout you had better put a waterproof sealant on to the tiles and grouts. In this way the mosaic tiles will be prevented from the water from bath or from the sink when the tiles are situated in the bathroom or in the kitchen. You will avoid the unpleasant appearing of mold which can influence the whole structure of the tiles. Sealant becomes as a very important protector, especially when natural stone is treated.


The regular cleaning of grout


Everyone knows that grout is the ideal place for attracting mold and dirt. That comes as a major reason to provide regular cleaning. The small mosaic tiles require even more extensive cleaning than usual, as usually you need more grout for this type of tiles. For that purpose you will need to use a special grout cleaner, not necessarily too expensive. You will also need a sponge and a toothbrush to clean all the joints until they become spotless. If you thinks it is too complicated you could hire professionals like BestLondonCleaners Notting Hill to do that for you.


Use soapy water for wiping down


Wiping of the ceramic tiles is more important than you can imagine. For the perfect look of the tiles you need to wipe them down with a soapy warm water after you have treated them with other chemicals or cleaning products. Even if you are absolutely sure that the product are safe, do not forget to provide wiping with soapy water. In this way no residual product will be left and your ceramic tiles will preserve their immaculate condition.


Do not use acidic substances on to the ceramic tiles.


We are all, from time to time, attracted by the idea to test some of the DIY ways for cleaning your home without spending significant amount of money. However, we advise you not to treat the ceramic tiles with acidic substances, such as vinegar and more often white vinegar. Using of such kind of substances on the tiles can lead to the damaging of the grouting and of the whole surface of the tile. For that reason, we advise you to use the traditional tile cleaners that have already proven their efficiency.


These are some of the tips that will help you to clean your mosaic in the most extensive way and to preserve its nice appearance for a longer time. It is not difficult to apply them on regular basis, so if you want to enjoy your perfect mosaic tiles take into account these tiny details.

Now to you-

How do you care for your mosaic tiles?


Wednesday, November 26, 2014

Gluten Free Traditional Stuffing Recipe

Stuffing is a traditional staple at the Thanksgiving table. However, when this staple makes you terribly ill, you pass this Thanksgiving favorite on to the next person. Many companies now offer a gluten free bread. Thus, making it possible for you to enjoy that traditional stuffing with everyone else at the Thanksgiving table.

I want to share with you my new found favorite, gluten free, traditional Thanksgiving stuffing recipe using the convenient crock pot.

gluten free stuffing

You will need:
1 large yellow onion, diced
1/4 cup chopped fresh parsley If you only have dried parsley that is fine. Use 1 tablespoon.)
1 cup diced celery 
1 cup tart apple, peeled and diced
1 tablespoon sage
1 teaspoon marjoram
1/2 teaspoon dried thyme 
1 teaspoon kosher salt
1 teaspoon black pepper
4 tablespoons (1/2 stick) butter, melted
1 loaf bread, cubed and lightly toasted in the oven (I used Udi's whole Grain Bread)
1 1/2 cups chicken or vegetable broth, plus additional 1/4 cup, if needed


stuffing ingredients

Use a 6 quart slow cooker. Put the onion, parsley, celery, and apple into the stoneware. Add the seasonings, and the melted butter. Stir well 
Add the bread cubes and toss to combine.

toasted bread

When the bread is nicely coated, pour in the broth. Cover and cook on high for 2 hours. (My crock pot tends to get extremely hot. So, I used the low setting for 2 hours.)
When done, the bread will have browned a bit on the top and around the edges, and it will be hot throughout. 
Your stuffing can stay warm for up to 2 hours before serving. Stir. If you would like additional moisture, add up to 1/4 cup of additional broth.

stuffing

This stuffing recipe was extremely quick and easy to throw together. Plus, it was the best tasting stuffing I have eaten since becoming gluten free. I believe the key is to toast the bread before adding to the crock pot. This step made my house smell wonderful. And you can see from the picture above, just how delicious and crunchy the bread became from being toasted in the oven.

"If you ask me what I came into this life to do, I will tell you: I came to live out loud." Emile Zola
The next time I recreate this recipe I will use dried parsley flakes. This is just easier for me. 

Now to you-

What secret ingredient do you add to your Thanksgiving stuffing? 


Monday, November 24, 2014

A Plum Paper Designs Planner Review

I purchased the Plum Paper Design Planner with my own money.
I have seen it written that when you start a blog, the next purchase you make is a daily planner. For me that was exactly what happened. I started reading blog posts and watching videos of what planner others had decided to use for the year. Last year, I chose the At-A-Glance daily planner. Read my post here. The key to any planner is to make that planner your own. Which I did, with the use of stickers, post it notes and Washi tape. 

While I love my planner, I decided that for next year, I was ready to move to a bigger planner. After doing much research, I chose to purchase a Plum Paper Design  planner. Plum Paper is a company based in San Diego, California. Along with the Life Planner that I purchased, this company offers planners designed for Teachers, Students, Family, also, Fitness, Meal and Wedding planners.


plum paper planner review


All of these items can be personalized and come in a wide range of design and colors. The planners are sold through Etsy and retails for $31.00 with a $10.00 shipping fee. They ship to U.S. and Canada. This a spiral bound planner with a thick 1 inch metal coil.

My planner starts on January 1, 2015. I am still using my Mead, At-A-Glance, daily planner that I started using on January 1, 2014. But, you can start the planner on any month and they offer an 18 month calender option.
The planner is shipped in a sturdy, heavy weight box. Bubble wrap surrounds the planner. Inside the bubble wrap, the planner is then enclosed in a plastic wrapper, as seen in the top right photograph. A translucent, plastic cover protects the heavy weight card stock displaying your cover design. You can choose from many different designs and colors. You choose what name to have designed on your planner. The first page, upon opening your planner, is the cover page with the design logo and a place to write personal information.


Open to the next page, this displays your year at a glance on 2 pages. The corresponding month and colors are identical throughout the planner. The next page consists of blank note pages followed with the monthly tab page.


The next page displays your month at a glance, on 2 pages. Along the left side of the planner, you have a section to jot down birthdays for the month, an event section and a note section. The large day of the month squares offer ample room to write down important dates. Major US holidays are written in gray and do not interfere with the design.


Following those pages, you open to the week at a glance, on 2 pages. Plum Paper offers 4 different options for the week to chose from when ordering, including  days broken down by Morning, Afternoon, and Evening, days broken down into 30 minute increments, days broken down with just lines, or lined note pages instead of the weekly spread pages. I chose the weekly blank lines. That is what works for me. I think it is fantastic Plum Paper offers 4 options, making the planner work to your specific needs. The bottom of the page offers a 3 point checklist.


The back of the planner has more blank pages for notes, not shown. You are given a contact page and then a schedule for the upcoming holidays at a glance. The last page is a year at a glance for the next year. I love that in the back of the planner you have a folder to hold any important papers or whatever else you need to keep track of. The back cover has the hard card stock covered with, again, the translucent, plastic cover. 

Shipping is scheduled for 3-4 weeks from when you place the order for your planner. Because I chose not to add any extra add ons, or changed anything from the basic planner, my planner arrived in 2 weeks time. 

Customer service is very helpful. I did not specify what name I wanted published on the cover of my planner. I emailed the company and within 2 hours I had confirmation that my request had been duly noted.

– This is a 12 MONTH REGULAR PLANNER that can begin in ANY month you choose.
– Planner Size: 7.5″ x 9″
– 12 Monthly LAMINATED TABS
– Clear Frost Plastic Cover
– Personalized Name on Cover
– Week, Month, and Year-at-a-glance pages
– 2 Notes Pages Per Month
– Contacts Page
– Holidays
– 2 Sided Pocket Folder
– The year on the cover will reflect the year/years of the planner ordered.
(example: A planner from August 2014 – July 2015 will have “2014-2015″ on the cover)

This planner is printed and bound in the U.S.

I hope this was helpful. Please let me know in the comment section below if you have any questions. 

For instructions to make your own coil clips for your planner, click here.
For instructions to make your own planner paperclip bookmarks, click here.
For instructions to make your own stickers , click here.

Now to you-

What is your favorite planner to use?


Friday, November 21, 2014

Gluten Free, All Natural Granola Recipe

When the 3:00 midday hunger cravings hit, instead of grabbing a cookie, grab a handful of this homemade granola to curb those cravings. Made with healthy ingredients, this recipe will satisfy that sweet tooth, while, also providing a much needed "crunch." The use of walnuts and pecans add a healthy benefit of protein to tide you over until dinner.

This recipe combines walnuts, pecans, honey and coconut with oats, so that one does not feel as though they are only consuming oatmeal.


hand made granola

This recipe requires only a few healthy ingredients, with little preparation that even an unskilled cook, such as I, pointing finger to self, can make this recipe.


natural granola

The ingredients I used were-

4 cups of Gluten Free quick cooking oats
I used Bob's Red Mill Gluten Free Whole Grain Rolled Oats, 32 Oz
2 cups sweetened coconut
2 cups walnuts 
1 handful of almonds
1 cup of pecans
3/4 cup coconut oil
1 and 1/2 teaspoon cinnamon
1/2 cup honey

Preset your oven to 375 degrees.
Mix all of the ingredients together in a large bowl.


granola
"To keep the body in good health is a duty...otherwise we shall not be able to keep our mind strong and clear." Buddha
Spread out your parchment paper on to 2 cookie sheets. 
Place in your oven and bake for 20-25 minutes. Stirring frequently.

(I used 2 small round cookie sheets. Because of that my granola took longer to cook, approximately 10 more minutes.)

I stirred the granola, once, about every 5 minutes. I did not want the granola to burn. 
When the granola reaches a nice rich, brown color, remove from the oven and allow to cool.


Place your granola in an air tight container. 
Serve on yogurt, grab a handful, or on a salad. 

After snapping pictures of this recipe, I enjoyed the fruit and granola for lunch. The granola was still warm from the oven. It was delicious.. 
Because I enjoyed the warmth of the granola, the next time, I will slightly warm the granola in the microwave before adding it on top of the yogurt.


Mix and match your desired choice of nuts. If pecans are not to you liking, substitute pumpkin seeds. Cashews or hazelnuts are also good options. The list is endless.


Now to you-

What are your healthy granola ingredients?


Wednesday, November 19, 2014

5 Blogs That Offer Free Thanksgiving Planner Printables

The holiday season can be a hectic and stressful time of year. Family functions, school functions, meal planning, the list is endless. With the assistance of check lists and schedules, written on pretty printables, you can keep track of those dates and activities that are too important to forget.


These wonderful ladies have created printed, planner lists to help us keep track of what needs to be done in the weeks and days leading up to Thanksgiving.

The Peaceful Mom is offering FREE Thanksgiving Planners. Free to download.
Kimberly shares, "Want a stress free Thanksgiving?" She breaks down the meal plans.

Mommayoung is offering a free Thanksgiving Dinner Planning Guide.

The Thrify couple shares with us, Stress Less with the free printable Thanksgiving Checklist. Added Bonus-The Thanksgiving Timeline.

The Polka Dot Posie shares her free printable for a binder or planner that includes housework, blessings and a coloring page.

Our Best Bites created printables for us to help plan for Thanksgiving and stay sane.

Thank you to these gracious women for sharing printables to help ease the strain and stress of planning for a Thanksgiving dinner.

Now to you-

Please share with us any printables of lists and schedules that help you this Thanksgiving holiday.


Monday, November 17, 2014

Create Planner Paperclip Bookmarks With Paperclips and Ribbon

Add your favorite ribbon to a paperclip and create a homemade bookmark. This is great to use in your yearly planner to mark important dates. Follow the steps below and you can make your own decorated bookmarks.


paperclip bookmarks

You will need:
Your favorite spool of ribbon
Scissors 
Tape measure
Paperclips


planner bookmarks

Choose your favorite ribbon and cut a strip about 4 inches long. Any strip shorter than 4 inches is difficult to work with. You can always cut the ribbon shorter when your paperclip is created, if you so desire.


bookmark

Fold the ribbon in half.


planner

Place the ribbon through the end of the paperclip, opposite the end that slips over the book page.


This step is tricky. With one hand hold on to the tail of the folded strip. With your index finger on your other hand, push the folded end open to form a loop. Bring the tail down through the top of the loop and pull up. This will tighten the loop and create the loop around the end of the paperclip.


The front side of the tightened loop.


The back side of the knot.

"Try a thing you haven’t done three times. Once, to get over the fear of doing it. Twice, to learn how to do it. And a third time, to figure out whether you like it or not."
—Virgil Garnett Thomson


Happy accident, this ribbon had an adhesive back. I was able to create clip click bookmarks using the same steps, with the ribbon, on the metal tabs of the clip. Plus, I was able to decorate and attach the ribbon to the metal bases on the clips.

Now to you:

What have you used to create your own, unique bookmarks.


Friday, November 14, 2014

Make Wrapping Bows From Recycled Papers Or Wrapping Paper

When I discovered this technique to make your own bows, I was flustered because I could not figure out how to twist the individual paper strips. But once I figured out how to twist and hold the paper strips, I was on a roll. In the instructions below, I will share with you how I made pretty bows using a recycled ad. A piece of everyday card stock. Also, create a bow that matches the paper you have chosen to wrap the present.


hand made bows

I took some pictures before I started the project. I will explain what worked for me.


For the bows you will need:
A tape measure
A paper cutter (if you do not have a paper cutter, you can definitely do this project with scissors.)
Your desired type of paper- I used a recycled ad, card stock and wrapping paper
Stapler
Double sticky tape or glue dots


(recycled ad)

Cut your strips of paper in the following lengths-
All the strips need to be cut at 3.4 inch width
3 strips need to be 9.5 inches long 
3 strips need to be 8.5 inches long
1 strip of paper needs cut to 6.5 inches long 
1 strip needs to be 2.5 inches long


You can  increase the length of the strips of paper to make a larger bow. But the bow becomes difficult to create when the strips are shortened. To make smaller bows, check out my post on 
How to make a bow using  a fork.

(card stock)

As I stated this will be the most difficult step in creating your bows. I am using the card stock to demonstrate how to hold and twist the strip of paper. 


With the printed side of the card stock facing away from you, bring the top of the strip of paper towards you and twist the paper so that the printed side is touching the blank side.


This is the step that I was stuck on but, once I figured out how to hold the paper it was a snap.

Now, turn the strip so that the tail that is facing towards to bottom of the picture, (or down), will now be facing up. Basically, use two hands for this step and transfer the bow to the top facing position. 


Now you will have another loop to create from the "tail."
This was the aspect of the project that stumped me. I was trying to twist the bow and not move it. I was trying to twist it in one hand. But, once I figured out how to move the bow so that you had 'tails" to work with, the project came together very easily.
As in the first step, bring the tip of the paper down and twist to form the loop. 
Both tips of the paper should be touching one another.


Now move the tips to the back of the bow. (From now on you will bring the strips of paper to meet behind the bow. I just wanted you to have a visual on how the strips should meet.)


Attach the ends to the back of the strips using either double sided tape or glue dots. I remembered the glue dots once I started the project. I liked using the glue dots over the double sided tape. I could work with the glue dots, the tape seemed to stick to everything. But if you have the tape, just use that.

This is how your finished strips of paper should look.


I am missing one twisted strip in this picture. I took the picture and then went back to my computer and there was the lost strip.

Lay the strips of paper on top of one another forming the look of a star.
First, group the 9.5 strips together and staple. In another group, lay together the 8.5 inch strips and staple.


Now arrange the 8.5 inch strips in the 9.5 inch strips, add in the 6.5 inch strip and staple everything together. 
Bend and move the strips to your liking. 


The finished bow. 
As I stated, I had taken the pictures before I started to work on the bows. I had cut a strip at 2.5 inches. The loop made from this strip was too small to fit my stapler. So, I did not use that strip. I bent the loops toward the middle of the bow, this hid the staple. 
Now, you may want to hide the staple altogether. Either staple that strip in the middle of the bow or use the double sided tape and attach to the middle of the bow. 


The finished bow from the recycled ad. This was by far my favorite bow to create. The paper was easy to bend and move. Because the paper was printed on both sides, I did not have to worry about twisting the bow to make sure the printed side was showing.

The recycled paper was also thinner, so I only needed one staple to hold all of the strips together.


The three completed bows. 

"It takes half your life before you discover your life is a do-it-yourself project." Napoleon Hill

Now to you:

Please let us know if you try this do-it-yourself, make your own home made bows. Or, if you have any bows that you make, please share your ideas.